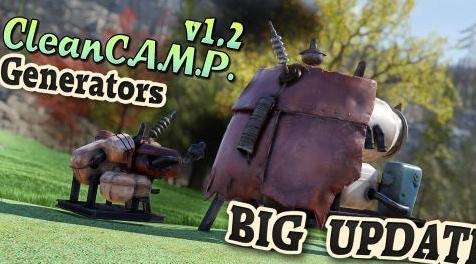
辐射76MOD CleanC.A.M.P. Generators

MOD介绍:
v1.2:从现在开始文件将是.ba2,下面将为新模块安装。
此更新添加了新的自定义法线贴图和光贴图+新的和改进的贴图!
更改日志:
v1.2:为纹理添加了法线贴图和光贴图,使它们看起来更漂亮,还有改进的纹理!
v1.1:添加了.ba2文件以便于安装!它应该正确包装,但请回顾它是如何工作的!
v1.0:基本纹理工作和映射。
警告:
你可能不会被禁止使用客户端纹理mods我相信,
但为了以防万一,这是一个警告,他们可能会这样做。
在开始时,我做了大量的研究来绘制纹理,因为..如果你一直在使用纹理,每次将它们与4GB存档文件合并,并且必须登录游戏以检查纹理是否错位无论如何,你都知道。我一直在为我的所有空闲时间工作4-5天,每天很多小时。我想我会帮助其他人参与我的这个项目,以及万一你会在另一个玩家阵营发现它们!未来可能会制作更多这样的物品,我已经有一些还没有完全准备好了!非常感谢你看看我放在一起的东西,我正在尽力拼凑并创造这些纹理,我希望你和其他人会发现我的mod很有用!
安装:
(这仅适用于初次使用的用户。我在安装它时遇到了很多麻烦并犯了很多错误,所以想过给出一些提示让它工作。如果你还有问题,请不要犹豫,问一下,我很乐意帮忙!)
____________________________________________________________________________________
1。将“CleanCAMP_Generators.ba2”复制到“C:\ Program Files(x86)\ Bethesda.net Launcher \ games \ Fallout76 \ Data”
2。转到“C:\ Users \ [Username] \ Documents \ My Games \ Fallout 76”并将“Fallout76Custom.ini”复制到该位置。
(如果您安装了其他mod,则只需将“CleanCAMP_Generators.ba2”添加到列表中。)
*用您的用户名替换[用户名]。
*如果安装在其他地方,请将C:\更改为D:\或E:\ etc以了解已安装文件的位置。
____________________________________________________________________________________
享受您的新CleanC#A#M.P。发电机!
~WarUlv
旧手动安装:
需要:
Fallout 4 Creation Kit的“Archive2.exe” - >更多信息< -
(在尝试安装纹理mod之前安装此工具!)
*注意:在按照以下步骤保存纹理以进行存档之前,请创建一个备份文件
“SeventySix - Textures02.ba2”和
“SeventySix - Textures03.ba2”,以防万一。
1。将“Textures02”和“Textures03”复制到 - >“桌面”或临时位置。
(完成后可以删除。)
2。启动Archive2.exe - >“C:\ Program Files(x86)\ Steam \ steamapps \ common \ Fallout 4 \ Tools”
3。文件 - >打开 - >“C:\ Program Files(x86)\ Bethesda.net Launcher \ games \ Fallout76 \ Data” - > SeventySix - Textures02.ba2
4。存档 - >添加文件夹 - > Textures02 - >“纹理”来自“桌面”或临时位置。
(确保选择“添加文件夹”,“不添加文件”。)
5。文件 - >保存并等待..
6。文件 - >打开 - >“C:\ Program Files(x86)\ Bethesda.net Launcher \ games \ Fallout76 \ Data” - > SeventySix - Textures03.ba2
7。存档 - >添加文件夹 - > Textures03 - >“纹理”来自“桌面”或临时位置。
8。文件 - >保存,你就完成了!
v1.2: The files will be .ba2 from now on, install will be shown below for new modders.
This update adds new custom normal-maps and light-maps + new and improved textures!
Change-log:
v1.2: Added normal-maps and light-maps for the textures, giving them a better look, plus improved textures!
v1.1: Added an .ba2 file for easier install! It should be packed correctly, but please comment back on how it works!
v1.0: Basic texture work and mapping.
WARNING:
You probably won't be banned for using client-side texture mods I believe,
but just in case, this is a warning that they might do it.
In the beginning, I did a lot of research to map the textures, because.. if you have been working with textures, merging them with 4GB Archive files each time and had to log into the game to check if the texture isn't misplaced in any way, you'd know. I've been working on this with all my free-time for 4-5 days straight, many hours each day. I figured I'd help out others with this project of mine as well as in case if you'll spot them in another player camp! Might make more items like this in the future, I already got a few that's not fully ready yet! Thank you so much for looking at what I've put together though, I'm giving my best at putting together and creating these textures and I hope you and others will find my mods useful!
Installation:
(This is just for first time users. I had a lot of trouble of installing it at first and made a lot of mistakes, so thought giving some tips to make it work. If you still have questions, please don't hesitate to ask, I'll be happy to help!)
____________________________________________________________________________________
1. Copy "CleanCAMP_Generators.ba2" to "C:\Program Files (x86)\Bethesda.net Launcher\games\Fallout76\Data"
2. Go to "C:\Users\[Username]\Documents\My Games\Fallout 76" and copy "Fallout76Custom.ini" to that location.
(If you have other mods installed, then just add "CleanCAMP_Generators.ba2" to the list instead.)
* Replace [Username] with your username.
* If installed elsewhere, change C:\ to D:\ or E:\ etc for where your installed files are located.
____________________________________________________________________________________
Enjoy your new CleanC#A#M.P. Generators!
~ WarUlv
Old Manual Install:
Required:
Fallout 4 Creation Kit's "Archive2.exe" -> More Info <-
(Install this tool before trying to install the texture mod!)
* Note: Before saving the textures to archive in the steps below, make a backup file of
"SeventySix - Textures02.ba2" and
"SeventySix - Textures03.ba2", just in case.
1. Copy "Textures02" and "Textures03" to -> "Desktop" or a temporary location.
(Can be deleted when done.)
2. Launch Archive2.exe -> "C:\Program Files (x86)\Steam\steamapps\common\Fallout 4\Tools"
3. File -> Open -> "C:\Program Files (x86)\Bethesda.net Launcher\games\Fallout76\Data" -> SeventySix - Textures02.ba2
4. Archive -> Add Folder -> Textures02 -> "textures" from "Desktop" or the temporary location.
(Make sure you chose Add Folder, NOT Add File.)
5. File -> Save and wait..
6. File -> Open -> "C:\Program Files (x86)\Bethesda.net Launcher\games\Fallout76\Data" -> SeventySix - Textures03.ba2
7. Archive -> Add Folder -> Textures03 -> "textures" from "Desktop" or the temporary location.
8. File -> Save, and you're done!
下载列表
回复区
昵称:
邮箱:
内容: